Adhesive wallpaper, also known as peel-and-stick wallpaper, has quietly emerged as one of the most accessible home décor upgrades available today: no paste, no soaking, no professional installer needed. Unlike traditional wallpaper, you are not committed to your choice for the next ten years.
What Makes Adhesive Wallpaper Different?
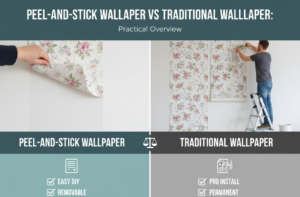
Traditional wallpaper requires an adhesive that penetrates the wall, making it very durable but quite hard to remove. Conversely, adhesive wallpaper functions like a large repositionable sticker.
The backing peels away to reveal a pressure-activated adhesive, which means it only fully bonds when you press it into place, and it can be lifted and repositioned before that bond sets.
This has several significant implications. First, errors are easily forgiven. Second, when you are prepared for a change, removal is generally simple. Third, it allows for creative applications that go well beyond typical accent walls, but more on that later.
Choosing the Right Wallpaper
Before you even think about your walls, the product you choose matters more than most beginners realize.
Thickness is crucial: Wallpaper with greater thickness is easier to hang, conceals minor wall imperfections, and provides a more refined appearance. Thin or budget options often stretch, form bubbles, and reveal every uneven spot beneath.
If the cost gap between mid-range and premium choices seems large, remember that you’ll spend a similar amount of time installing a cheaper roll and probably be less satisfied with the outcome.
Texture matters too: Adhesive wallpaper works best on smooth walls. If your walls have a heavier knock-down or orange peel texture, the adhesive might not fully grip the high points, causing edges to lift over time. Smooth walls are the ideal choice. Heavily textured walls might require a skim coat before you begin.
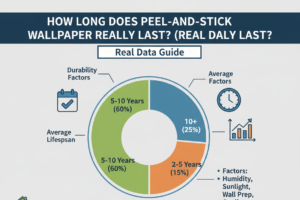
The location where you install it is important: Not all rooms are suitable for adhesive wallpaper. Steam showers in bathrooms, spots directly above a stove in the kitchen, or ceilings are places where adhesive may weaken over time due to heat, moisture, or gravity. Bedrooms, dining rooms, hallways, nurseries, and living rooms are all great options.
Tools You’ll Need
You don’t need a large collection of specialized tools, but having the right ones makes the process significantly smoother:
- Measuring tape: for accurately sizing your panels.
- Pencil: for marking reference lines.
- Laser level (highly recommended): wall corners are rarely perfectly plumb, especially in older homes; a laser level provides a true vertical reference line that corners cannot offer.
- Sharp utility knife with fresh blades: change blades frequently; a dull blade drags and tears.
- Scissors: used for rough cutting and trimming around awkward shapes.
- Straight edge or ruler: used for clean, guided cuts.
- Soft smoothing tool: often included with better-quality wallpaper; essential for pressing out bubbles without scratching the surface.
- Isopropyl alcohol + water solution: used for cleaning walls before installation.
- Microfiber cloth: used for applying the cleaning solution.
- Hair dryer: useful for both removing wallpaper and helping it conform around tight corners.
- Wallpaper helper spray (optional but highly recommended for beginners): a product that forms a microscopically thin slip layer between the adhesive and the wall, providing extra time to reposition before the bond becomes permanent.
Preparing Your Walls
The most frequent cause of adhesive wallpaper failing—peeling off within weeks, bubbling in the middle, or lifting at the edges—is inadequate wall preparation.
Although this step is less exciting than unrolling a beautiful pattern, it is crucial to the success or failure of your project.
If you’ve recently painted, wait. Walls that have been freshly painted require at least 4 weeks to fully cure before applying any adhesive product. If you apply wallpaper to paint that hasn’t cured, it will likely peel off, often taking the paint with it.
Thoroughly clean your walls. Combine isopropyl alcohol with water and wipe the entire surface you intend to wallpaper, including corners and edges. This eliminates grease, dust, and any residue that could hinder the adhesive from bonding. Allow the wall to dry completely, and wait at least a few hours before laying the panels.
Remove anything from the wall. Take down hooks, adhesive strips, outlet covers, and light switch plates. Turn off the electricity at the breaker before removing outlet covers, and cover exposed outlets with masking tape.
Check the weather. Days with extreme humidity, either very high or very low, affect how well adhesive wallpaper adheres and how quickly it initially sets. A moderate-humidity day will give you the smoothest installation experience.
How to Install Adhesive Wallpaper?
Step 1: Measure and Cut Your Panels
Measure the height of your wall at a minimum of two or three locations, as walls, particularly in older homes, are seldom even. Take the longest measurement and add approximately 10 cm (4 inches) overall, allowing for trimming at the top and bottom. Mark and cut each panel before adhering anything to the wall.
Arrange your cut panels on a clean floor in order and verify how the patterns match across panels. Usually, each panel is numbered or has matching markers at the edges to help align repeats. Do this before installation, not afterward.
Step 2: Establish a True Vertical Line
Avoid using a wall corner as your initial reference. Use your laser level to project an accurate vertical line where the edge of your first panel should be. Lightly mark it with a pencil. This one step helps prevent gradual misalignment that can make patterns appear significantly crooked by the time you reach the opposite side of the wall.
Step 3: Apply Your Helper Spray (If Using)
If you’re using a wallpaper helper spray, apply it to the section of the wall where your first panel will go. This provides a slip layer for the adhesive, allowing you to slide and reposition the panel until you are happy with the placement.
Once the spray dries, the bond becomes permanent. For beginners, this product is genuinely worth the small extra cost.
Step 4: Apply the First Panel
Roll up the first panel, peel back about 30 cm (12 inches) of the backing from the top, and align the panel’s edge to your plumb line. Leave a few centimetres of excess at the top for trimming later.
Use your smoothing tool to press that first section onto the wall, applying gentle, even pressure in diagonal motions from the center outward. Avoid using credit cards, hard plastic tools, or any rigid objects, as they can scratch and damage the surface.
After the top section is smoothed and aligned, peel back the backing gradually, about 30 cm at a time, while smoothing as you proceed. Do not remove the entire backing all at once.
Step 5: Smooth as You Go
Bubbles are the enemy, and they are also mostly preventable. The main point is to apply steady pressure with your soft tool in outward, diagonal strokes as you work down the panel. If a bubble shows up and you are using the helper spray, you can carefully lift the affected area, reposition it, and smooth it out again.
If you’re not using the spray and the adhesive has already bonded, gently press the bubble toward the closest edge.
Do not pull or stretch the panel during application.
Even minor stretching can distort the pattern, making it much more difficult to align the next panel.
Step 6: Install Subsequent Panels
Each extra panel should overlap the previous one by approximately 1 cm, according to the manufacturer’s guidelines. Begin by aligning the pattern at eye level, then gently smooth upward toward the ceiling and downward toward the floor.
Pay special attention to the seam. Use your smoothing tool along the overlapping edge to press it securely so it doesn’t begin to lift over time.
Before fully smoothing each new panel into position, ensure it’s straight by referencing your pencil plumb line or re-projecting your laser level.
Step 7: Trim the Edges
After installing all the panels, use a sharp utility knife and a straight edge to cut off the excess along the ceiling, baseboards, and nearby walls. Change your blade often; a dull knife results in jagged, noticeable cuts.
Wrap the panel around the corner by approximately 0.5 cm for corners, then begin the next panel on the adjacent wall with a slight overlap. This method accommodates corners that are not perfectly square and ensures that each panel’s vertical edge remains straight.
Step 8: Handle Outlets and Switches
To cut around a light switch or outlet, smooth the wallpaper over the opening, then make a small X-shaped incision in the center using your utility knife. Carefully trim around the edges of the outlet box, fold the excess behind the cover plate, and then replace the cover plate for a neat, professional appearance.
Interior Corners: The Trickiest Part
Most beginners attempt to bend a full panel into and around an interior corner in one piece. This is where misalignment often worsens. A better approach is to wrap the current panel around the corner by approximately a quarter inch, then begin a new panel on the adjacent wall.
Use your level to establish a new plumb line for that fresh panel. Because almost no corners are perfectly square, this two-piece method ensures any deviation remains concealed within the corner rather than spreading throughout the entire new wall.
Removing Adhesive Wallpaper Without Damage
Removing it becomes simpler when you take your time. The most common error people commit is grabbing a corner and pulling forcefully, which can rip drywall paper or peel paint if the paint isn’t fully cured or was applied over fresh drywall.
Before removing any panel, gently warm the surface with a hair dryer. The heat softens the adhesive’s grip, allowing the panel to release much more cleanly. Peel from a corner at a slow, steady 45-degree angle while keeping the adhesive warm with the dryer. If resistance increases, apply more heat rather than more force.
If you need to move a panel to a different wall rather than discard it, reapply the backing paper before rolling it up to protect the adhesive surface.
Beyond Accent Walls: Creative Uses for Leftover Rolls
One of the underappreciated advantages of adhesive wallpaper is that it can be applied to many more surfaces than just walls. A leftover half roll has a lot of potential:
Drawer liners. The inside of a dresser or desk drawer becomes instantly more cheerful with a cut-to-size piece of adhesive wallpaper. It protects the surface and adds a pop of pattern every time you open the drawer.
Bookshelf backs. Creating a backdrop with the back panel of an open bookshelf adds a curated and intentional setting that highlights your books and objects.
Stair risers. Applying bold or patterned adhesive paper to stair risers turns a functional component into a striking visual element. This works particularly well with patterns resembling tiles.
Picture frame mats. Instead of paying for professional framing matting, cut a piece of adhesive wallpaper to size as a decorative mat inside a standard frame.
Furniture accents. The back panel of a credenza, the side of a plain fridge, or the face of a flat cabinet door can all be changed with adhesive wallpaper. Just ensure the surface is clean and smooth.
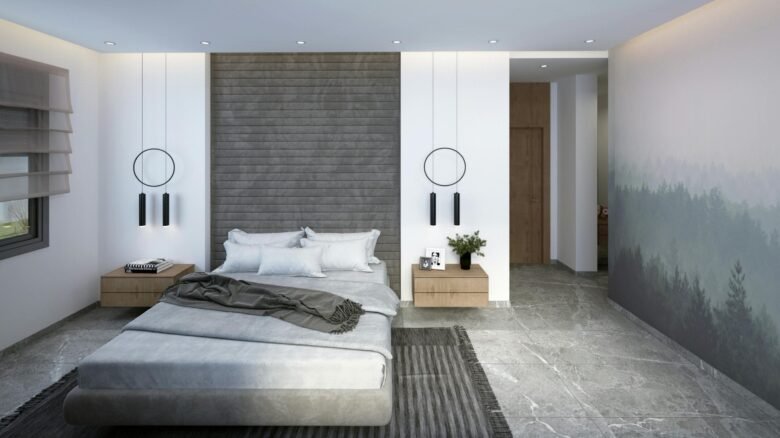
Simulated headboard. If your bedroom lacks a headboard, a panel (or a few panels) of adhesive wallpaper in a headboard shape, placed directly behind the bed, creates the visual effect at a fraction of the cost.
Room-by-Room Recommendations
Bedroom: An excellent candidate. Even a single feature wall behind the bed adds significant visual impact. Choose a pattern you won’t tire of quickly. Bedrooms are where you start and end each day.
Nursery: It is perfect for adhesive wallpaper. As children grow, patterns can be changed, making it easy to refresh the room without painting, which is very convenient.
Dining room: Another excellent option. Covering the entire dining room wall with wallpaper creates a striking, well-defined area, and since it is usually viewed from afar, the patterns look especially appealing.
Hallway: Frequently ignored but very impactful. Hallways are surfaces with minimal contact, free of steam or grease, and selecting a good pattern helps make the transition between rooms seem deliberate.
Living room: Suitable for a feature wall or alcove, although larger open-plan areas might need more accurate pattern-matching across multiple panels.
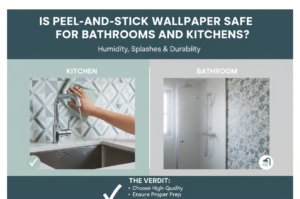
Bathroom: Be careful when using it here. Over time, steam and humidity can weaken the adhesive. If you decide to use it in a bathroom, select a spot away from the shower and ensure proper ventilation.
Kitchen: Avoid areas near the sink or stovetop where splashes occur. A small part of the wall in a breakfast nook or a low-traffic wall away from cooking areas is a better choice.
Summary
Adhesive wallpaper: value preparation and patience over quickness. Thoroughly clean your walls, set a reliable vertical reference line, and smooth carefully as you work. The outcome will appear much more professional than the “DIY” label indicates.