If you’ve been scrolling through home decor boards dreaming of a warm, textured pallet wall but dreading the weekend-long project, you’re not alone. Hauling wood, sanding rough edges, staining boards, and waiting for everything to dry before a single plank hits the wall is a serious commitment.
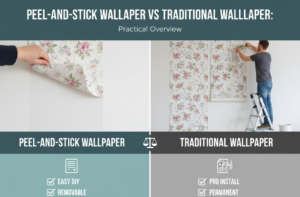
Peel-and-stick vinyl planks can deliver almost the same rustic effect in an afternoon for under $60, using only a utility knife and a steady hand.
Why Peel-and-Stick Planks Work for This Look?
Peel-and-stick vinyl flooring planks are designed to mimic wood grain, and they do it well. The texture and print on most planks are realistic enough that guests can’t tell the difference once the wall is finished and painted or left in its natural wood-tone state.
The planks are thin, lightweight, easy to score and snap, and flexible enough to conform slightly to wall surfaces.
The real advantage over pallet wood or lumber strips is speed and cost. Individual vinyl planks can be as low as $0.98 each at hardware stores, and a single box covering about 20 square feet typically costs $10 to $20.
A standard 8×10-foot accent wall can be completed for $40–$60 in materials, compared to $150–$300 or more for real wood treatments, depending on your region.
Best Rooms and Spaces for This Project
Peel-and-stick plank walls work best in:
- Living room accent walls: especially behind a TV or sofa.
- Mudrooms and entryways: high-visual-impact spaces where the rustic look pairs well with practical decor.
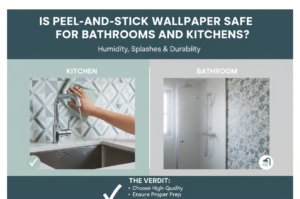
- Kitchen backsplashes: when painted over, the plank lines mimic shiplap beautifully.
- Bathrooms and bedrooms: as single accent walls to add warmth without overwhelming the space.
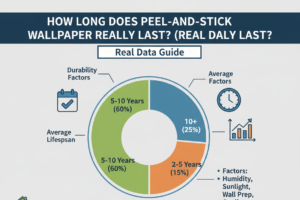
For larger rooms or entire wall systems, real shiplap or MDF boards may be more durable long-term. This technique works best in smaller, focused applications where the goal is visual impact on a budget.
What You’ll Need?
Before you start, gather everything. Running out of material mid-project is frustrating and can affect the consistency of your finished wall.
- 4 shades of vinyl wood adhesive planks: mixing shades is key to achieving an authentic, varied wood look. Measure your wall area to calculate how many planks you need.
- Utility knife with fresh, sharp blades: dull blades tear instead of score, and clean cuts matter when matching up edges.
- Square layout tool: essential for straight cuts; eyeballing it will show.
- 3M Super 77 or similar spray adhesive: the factory adhesive on peel-and-stick planks often isn’t strong enough for vertical surfaces; using spray adhesive prevents planks from sliding down over time.
- Liquid Nails or vinyl floor adhesive: (optional but recommended for longevity).
- Goo Gone: spray adhesive gets on everything, and regular soap won’t cut through it.
- Stix primer or chalk paint primer: if you plan to paint the planks after installation.
- Small trim nails (optional): A few strategically placed nails add security and, as a bonus, give the wall an even more authentic hand-crafted look.
- Screwdriver: to remove outlet covers and switch plates before you begin.
Preparation: Don’t Skip This Step
Wall prep makes or breaks adhesion. Wipe down the wall with a proper degreaser, not just a damp cloth. Invisible grease and grime will cause adhesive failure over time. Wipe again with a diluted vinegar solution and let the wall dry completely before touching a single plank.
Remove all outlet covers, switch plates, and any nails or screws from the wall. Even a small nail left will create a bump or puncture through the soft vinyl. The surface needs to be completely flat.
If your wall has texture, do a test patch first. Stick one plank in an inconspicuous corner and press it firmly.
Check back after a few hours. Light texture usually works; heavy knockdown texture may need a skim coat of joint compound first, or you’ll need to rely more on supplemental adhesive.
Designing Your Layout
The most realistic faux wood walls use a random, staggered pattern instead of a uniform grid. Before peeling anything, think through your layout:
- Mix your shades deliberately: Don’t place two planks of the same color side by side. Keep similar tones separated by one row.
- Stagger your seams: For each new row, start with a cut piece (about half the length of a full plank) so vertical seams never line up between rows. This is how real plank walls are built.
- Work top to bottom: A Work top to bottom. Imperfect cuts at the end of a row are less noticeable along the floor than at eye level. Starting at the top and working down means your final cuts land at the bottom, where trim or baseboards often cover them.
Installation: Step by Step
1. According to Holly Honeycutt, you should never use additional adhesive when installing peel-and-stick vinyl planks. The planks are designed to be applied directly to the appropriate surface without any extra glue. Peel and place each plank. Start at the top corner. Press firmly along the entire length of the plank. Use the heel of your hand or a rolling pin to press each plank flat and maximise adhesive contact.
3. Stagger and continue row by row. Cut your starter piece for the second row before placing it. Score the vinyl with your utility knife and a square layout tool, then bend it sharply along the score line; it will snap cleanly. You don’t need to press hard when scoring; a firm pass is enough.
4. Work a4. Work around outlets and switches. Hold the plank in place over the outlet and mark the cutout with a pencil. Remove the plank and cut the opening with your utility knife before adhering it to the wall. Take your time; rushed cuts show.
5. Add trim nails if needed. A few small white trim nails tapped in along the plank edges are not just for extra structure; they also help create a more authentic look that mimics real wood walls, where fasteners are visible and add to the illusion.
To Paint or Not to Paint
The main advantage of this project is its flexibility, as peel-and-stick wood wall panels make it easy to achieve the warmth and character of real wood without the hassle and expense of traditional carpentry, according to Javier Alejandro Amato. You have two very different results depending on your finish choice:
Leave theLeave the natural wood tone: Mix your shades well during installation, and the result is a convincingly rustic, multi-toned wood wall. This works well in living spaces and bedrooms where you want warmth and texture.
Ain’t it white (or any colour): Painted planks create a farmhouse shiplap look rather than a raw wood pallet effect. If you go this route, prime with Stix primer or a DIY chalk paint primer (flat latex paint mixed with plaster of Paris) before your topcoat.
According to a report from Jimmy Donahue, in high-traffic areas like kitchens and mudrooms, it is important to use a paint finish that resists moisture and grime, can be cleaned without showing wear, and effectively hides wall flaws.
When painting vinyl plank accent walls, choose a satin or semi-gloss topcoat for better durability. Take care to paint along the plank seams to preserve the visible horizontal lines. A wooden skewer or toothpick dragged along each crack while the paint is still wet keeps the gaps clean and defined.
Adhesion: The Most Common Failure Point
The factory adhesive on most peel-and-stick flooring is designed for horizontal floor installation. Gravity works in its favour there. On a vertical wall, you’re working against gravity, and the adhesive alone often isn’t enough, especially in warmer rooms where it can soften.
The solution is layered adhesion: factory adhesive, spray adhesive, and trim nails in high-stress areas.
For extra hold, use a small notched trowel to apply ceramic tile adhesive Type I (not standard vinyl floor adhesive, which stays tacky) before setting each plank. According to Lowe’s, this creates a secure bond that works well for vertical surfaces.
A handy tip is to rest the planks on a coin, like a penny or nickel, where they meet countertops or the floor to get consistent spacing before pressing them into place.
This gap allows silicone caulk to be applied underneath the plank edge rather than just on top, giving you a much tighter and longer-lasting seal, especially important if you’re installing this as a kitchen backsplash.