Peel-and-stick wallpaper promises a fast room refresh with no paste but it will lift when the adhesive can’t make full contact, the wall surface interferes chemically or physically, or the environment weakens the glue.
This article is for DIYers, renters, and contractors who want to reduce failures, make durable repairs, and choose installation steps that actually work.
Adhesion depends on three simple factors: surface cleanliness and texture, adhesive chemistry and condition, and the room’s temperature and humidity. Below are clear checks, prep steps, installation techniques, repair methods, and realistic cost and timing expectations so you can prevent most failures and fix the rest.
How do surfaces defeat adhesives?
Adhesives work by making intimate contact over as much surface area as possible. Anything that creates a thin barrier or gaps, such as grease, dirt, glossy paint, texture peaks, or existing wallpaper, reduces contact and leads to edge lifting or slow creep.
- Paint sheen: Glossy and satin finishes are smoother, which reduces mechanical grip. Flat paint gives more tooth for adhesive to contact.
- New paint: Paint that hasn’t cured can off-gas solvents or hold surface additives; many adhesives fail on paint under 2 weeks old, and low-VOC paints often need 21-30 days to stabilize.
- Texture: Orange peel, knockdown, or heavy stipple leaves voids beneath the paper. Small texture is manageable; heavy texture usually requires skim-coating for reliable adhesion.
- Residues: Cooking grease, silicone caulk, dust, and cleaning-film chemicals act like a release layer. Invisible hand oils can affect small panels and seams.
- Old wallpaper: Applying over existing paper is risky, old seams may delaminate, and the two layers react differently to temperature and humidity.
Environment and handling that change the adhesive performance
Temperature and humidity directly affect tack and cohesion. Adhesives need warmth to wet a surface and enough cohesive strength to hold over time.
- Temperature range: Most manufacturers recommend about 65-75°F for the application. Below about 60°F, the adhesive can be stiff and won’t wet properly; above about 80°F, seams are more likely to shift as materials relax.
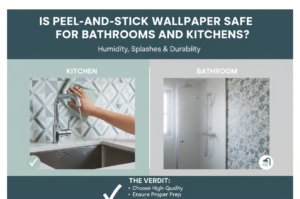
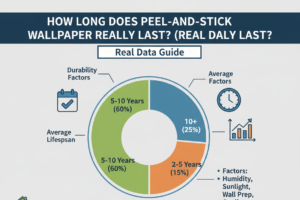
- Humidity: Ideal relative humidity is 30-50%. High humidity or steam (bathrooms, behind ranges) softens adhesive and can trap moisture, creating bubbles and failure.
- Storage and age: Rolls stored in extreme heat or cold can suffer adhesive separation or crystallization. Use fresh rolls and avoid storage in attics or damp basements.
Material quality and manufacturing variables
Not all peel-and-stick products use the same glue or carrier. Cheap films sometimes use a removable-grade adhesive that loses tack sooner. Backing paper and release liners also vary—some leave microscopic fibers on the adhesive when peeled.
If you must choose between a low-cost pattern and a well-reviewed midrange product, the latter is usually wiser for long walls or humid rooms.
Prepare walls so wallpaper will stay put
Most failures trace back to insufficient prep. The goal is a clean, flat, stable, and chemically compatible surface. Do these in order and allow proper drying and cure times.
Cleaning, patching, and ensuring paint compatibility
- Cleaning: Use a mild degreaser or a TSP-substitute, rinse thoroughly, and let the wall dry 24 hours when possible. For kitchen walls, remove carbonized grease with a stronger kitchen cleaner first.
- Patching and sanding: Fill holes and dents with lightweight spackle; sand smooth with 120-220 grit. Remove all sanding dust with a vacuum and tack cloth—dust reduces adhesive contact.
- Scuff-sanding glossy paint: Lightly scuff glossy or satin finishes with 220 grit or use a liquid deglosser to add tooth. Wipe with isopropyl alcohol to remove sanding oils and dust.
- New or low-VOC paint: Wait 14 days for conventional paint,21-30 days for low-VOC/zero-VOC if possible. If you must install sooner, test a 12 in x 12 in scrap and monitor for 48-72 hours before committing to the whole wall.
- Priming: Use a low-absorbency primer or a primer labeled for vinyl/wallpaper adhesion, especially over patched areas or porous drywall.
If walls are heavily textured, estimate the effort to skim-coat versus switching to a thicker wallpaper meant for textured backing. Skim-coating takes time and cost but yields the most reliable result.
Targeted environmental controls and timing
- Install temperature: 65-75°F during installation and for 48-72 hours after. Keep the thermostat stable to avoid expansion/contraction during curing.
- Control humidity: Aim for 30-50% relative humidity. Use exhaust fans or dehumidifiers if installing in a kitchen or bathroom. Avoid installation during or right after humid weather events.
- Work timing: Plan installs on a day when the room won’t be heavily used for at least 24-48 hours. Avoid scheduling around HVAC cycles that will switch from cool to heat immediately after install.
Tools, materials, and safety precautions
The right tools and careful technique reduce rework. Below is a compact kit for most peel-and-stick installs plus essential safety notes.
- Tools and consumables: sharp utility knife; extra blades;6 in vinyl smoother or microfiber squeegee; seam roller; measuring tape; laser level or plumb bob;1 in painter’s tape; ladder; bucket and sponge; small caulking tool; seam adhesive or removable double-sided mounting tape (thin foam-free type).
- Optional aids: isopropyl alcohol and spray bottle (1:1 with water) for stubborn oily residues; low-absorbency primer labeled for wallpaper; E-Z Hang style application aid for very large sheets.
- Safety: Use a new blade and cut away from your body. Secure ladders on level ground. Work in a well-ventilated space when using solvents or primer, and follow the label VOC and drying instructions. Test chemical cleaners in a hidden patch before full use to ensure paint compatibility.
Installation techniques that reduce lifting
Technique makes a measurable difference. Small operational details, such as how you peel, how much tension you use, and how you smooth, change long-term performance.
- Plumb guideline: Start with a perfectly vertical guideline using a laser level or plumb bob. Cumulative misalignment shows as stepping across the wall if panels shift.
- Top-first method: Peel a few inches of backing at the top, align the panel, stick the top edge, then pull more backing as you smooth down. This limits trapped air and lets you reposition small amounts.
- Smoothing pattern: Work in 6-12 in strokes from the center toward the edges. Overlap passes rather than pushing once; repeated, firm passes create more contact than a single fast swipe.
- Seam treatment: Use a seam roller lightly on vertical seams only. Excessive force thins the adhesive. For countertop edges or wet zones, run a thin bead of clear silicone or wallpaper seam adhesive and allow 24 hours to cure before exposing to steam.
- Cutting: Score with a new blade and make multiple shallow passes rather than one heavy cut. Replace blades every 2-3 panels for clean edges.
- Avoid overstretching: Keep the material relaxed when aligning. Stretching it in place leads to shrinkage and later gaps at the seams.
Small observations that matter: cooling a sheet slightly in a shaded spot before final smoothing helps reduce temporary heat-induced creep, and when installing long panels, have a second person hold the bottom to keep tension even while you align the top.
How to repair wallpaper that’s coming off?
Quick, targeted repairs often restore panels without wholesale replacement. Match the fix to the failure mode: edge lift, bubbles, or large delamination.
Edge lift fixes
- Small edge lift: Clean the substrate behind the lifting edge with isopropyl alcohol. Apply a thin bead of wallpaper seam adhesive or removable double-sided mounting tape; press with a seam roller and weigh the area for 1-2 hours.
- Large edge lift: Peel back gently, clean both the wall and the back of the paper if reusable, and reapply. A light mist of water with a drop of dish soap on the wall can allow repositioning for some adhesives—test a small area first because not all adhesives tolerate moisture.
Bubbles and trapped air
- Small bubble: Poke a tiny pinhole and smooth air toward the hole. Use a microfiber smoother to press the area flat.
- Large trapped area: Peel back and reapply with better smoothing and greater pressure; use a seam roller along edges to re-establish contact.
When to replace panels?
Replace when the adhesive has transferred unevenly, the backing is torn, or multiple repairs are required. Persistent areas of failure usually point to the substrate or environment—fixing the wall prep and addressing humidity will prevent repeat failures.
Cost and time expectations
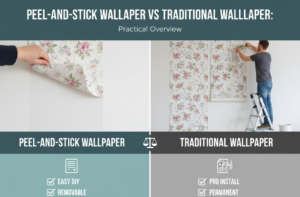
Peel-and-stick is generally lower cost and faster than traditional paste wallpaper, but budget realistically for prep and possible repairs.
| Task | Typical cost range (materials) | Time required (single room,8 ft ceiling) |
|---|---|---|
| Wall cleaning and minor patching | $10-40 | 1-3 hours (plus drying) |
| Primer (1 gallon) | $15-40 | 1-2 hours to apply,2-6 hours dry time |
| Peel-and-stick wallpaper (per roll, pattern dependent) | $25-80 | 2-6 hours for a single accent wall |
| Tools (one-time purchase) | $15-60 | N/A |
Time notes: Plan for 30-45 minutes per panel for accurate measuring, cutting, and smoothing once you have practice. Hiring a pro can add $100-300 in labor depending on wall area and complexity.
Real-world scenario: a kitchen wall that kept lifting
A patterned peel-and-stick was applied as an accent above a kitchen counter. After 3 weeks, the bottom strips started lifting. Root causes were visible: a thin layer of cooking grease on the paint and a semi-gloss finish.
The effective fix was to remove the lower strips, degrease with a kitchen cleaner, scuff-sand the sheen, apply a low-absorbency primer, and reapply replacement panels with seam adhesive along the countertop. The panels then stayed put for more than a year and resisted occasional steam from cooking.
Surface contamination and finish sheen are common, fixable problems—cleaning and priming changed the surface chemistry so the adhesive could form a stable bond.
Common mistakes and decision triggers
Skipping testing: Install a 12 in x 12 in scrap on questionable walls and check adhesion for 48-72 hours before committing to the whole wall.
- Rushing smoothing: Slow, repeated passes with firm pressure create stronger contact than a single fast sweep.
- Installing in direct sun or on hot surfaces: Heat may boost initial tack but accelerates creep—install in shaded, stable conditions.
- Assuming “removable” equals “no prep”: Removable adhesives still require a compatible substrate; skipping primer or cleaning leads to partial lifts and sticky residue.
When to seek professional help?
Hire a pro if walls are heavily textured, painted with specialty coatings, or you’re covering an entire room with complex pattern matching. Professionals bring experience with adhesion testing, primers, and application tools that reduce waste and rework—especially useful when you’re working with expensive wallpaper.
Look for installers who include priming and adhesion testing in their prep and ask for photos of similar projects.
Practical wrap-up
Peel-and-stick wallpaper falls off for predictable, fixable reasons: poor surface prep, incompatible paint or texture, environmental extremes, or low-quality adhesive. Prevent failures by cleaning and patching, testing on new paint, priming when needed, installing at a stable temperature and humidity, and using proper smoothing and seam techniques.
Repair small lifts promptly with seam adhesive or removable double-sided tape; replace panels when the adhesive or backing is damaged.